This is a MUST if you love Shortbread with a cuppa, it's all in one! Result!
I came up with this recipe after being inspired by someone i saw using bagged tea in cakes....I have to admit, it's divine, so gloriously subtle it's almost quite dainty!
.Ingredients.
175g/6oz plain flour
Pinch of salt
55g/2oz caster sugar plus extra for sprinkling
115g/4oz butter, chopped into chunks
2 Earl Grey tea bags, tear open the bags to remove the tea, discard the paper bags.... I used Twining's
Unwaxed lemon zest, finely grated
.Method.
Pre heat oven to 150'C/300'F/Gas mark 2.
Grease a 20cm (ish) tart or cake tin (TIP.... I keep a knob of real butter in my fridge so it's nice and hard, makes it so much easier and less messy to grease a tin and when you're done just lob it back in the fridge for next time).
Mix together the flour, salt, sugar, Earl Grey tea and grated lemon zest in a bowl, then rub in the butter, mix until it forms a soft dough, don't over work the dough or your end result will be like you're chewing on an eraser!
Press the dough into the greased tin, if you're not using a tart tin maybe use a fork to make imprints around the edges to make it look fancy pants.
Mark eight pieces with a knife and prick all over with a fork.
Pop in the oven for 45-50 minutes, until the shortbread is firm and just coloured.
Leave it to cool a little in the tin then sprinkle with caster sugar. Cut the portions then remove and leave to completely cool on a wire rack.
ENJOY! x
Wednesday 23 January 2013
Wednesday 9 January 2013
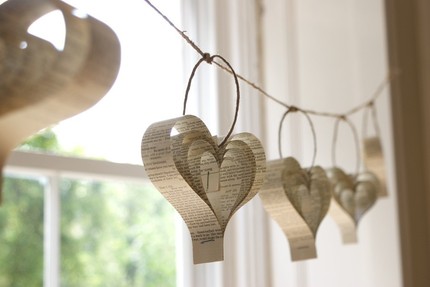
Paper heart garland, superscrimper style!
WARNING: SUPER QUICK AND ADDICTIVE CRAFT!

I showed this on Channel 4s Superscrimpers and also while I was hosting a talk at The ideal home show, they where shown as Christmas decorations but Truth be told, these adorable paper hearts are for all year round and I currently have my kitchen wall teaming with the beauty's, and the joy is, they take 5 minuets to make but look super complicated and you in turn super crafty and smart..... WINNER!
Here's what I did.
Cut 6 strips out of you some pretty paper (I used pages from an old dog eaten/unreadable book) you need to cut 2 of them at 12cm x 2cm, 2 at 10cm x 2cm and 2 at 8cm x 2cm.
Take some string that's about 15cm (ish) and fold it in half (making a loop)
now you need to make a sandwich with your string and paper, so, take your two 12cm strips and sandwich them either side of your string making sure the middle of the looped string is at the top of the strips and the cut ends of string are running towards the middle of the strips of paper.
IMPORTANT...if you are using paper with writing on it, the writing needs to be upside down at this point....so the top is effectively the bottom.....gettit!
now take your 2 10cm pieces and sandwich them either side of the 12cm strips, making sure the strips and string are all level at the top.
then finally make a sandwich with the 2 8cm strips.
grab a staple and clip the layers together, make sure your nice and firm so the string doesn't fall out!
NEARLY FINISHED! Now flip it over and pull down the 2 8cm strips so the ends meet together, then the 10cm strips, then the 12cm strips, making sure the ends are held together and lined up neatly like a deck of cards! Clip together with a staple.
give it a little jig and pull and your DONE! if my instructions are any good they will look like the picture above!
You can tie tonnes of them onto a long length of string and smirk with smirky smugness when your friends ponder with glee at your hand crafted garland......"oooh your so crafty arn't you" *side eyes*
Till next time x x
Subscribe to:
Posts (Atom)

